References
- Professional C++
- https://en.cppreference.com/w/
Contents
- Compile-Time rational numbers (컴파일 시간 유리수, ratio)
- Duration
- Clock
- Time Point
이번 포스팅에서는 C++ 표준 라이브러리에서 시간 관련 기능인 chrono 라이브러리에 대해서 알아보겠습니다. C++의 chrono 라이브러리는 time과 date를 다루는 클래스로 다음과 같은 요소들로 구성되어 있습니다.
- Durations
- Clocks
- Time points
- Dates (C++20)
- Time zones (C++20)
모두 <chrono>에 정의되었으며 std::chrono 네임스페이스에 속합니다. 이번 포스팅에서는 chrono 라이브러리 중에서도 시간(time)과 관련된 기능들에 대해서 살펴보고, C++20부터 추가된 Date와 Time zone은 조금 더 공부해보고 정리하여 추가로 포스팅하도록 하겠습니다.
chrono 라이브러리에 대해 살펴보기 전에, 먼저 compile-time rational number에 대해서 먼저 알아볼텐데 이는 chrono 라이브러리에서 사용됩니다.
Compile-Time Rational Numbers
Ratio 라이브러리는 유한 유리수(finite rational number)를 컴파일 시간에 정확히 표현할 수 있습니다. 이 라이브러리에 관련된 내용은 모두 <ratio> 헤더 파일의 std 네임스페이스 아래에 정의되어 있습니다.
유리수를 구성하는 분자와 분모는 std::intmax_t 타입의 컴파일 시간 상수로 표현합니다. 이 타입은 부호 있는 정수 타입으로 최댓값은 컴파일러마다 다릅니다. 여기서 제공하는 유리수는 컴파일 시간에 결정되기 때문에 다른 타입에 비해 사용법이 다소 복잡해보일 수 있습니다. ratio 객체를 정의하는 방식은 일반 객체와 다릅니다. 메소드를 호출할 수 없으며 타입 앨리어스처럼 사용해야 합니다.
예를 들어, 1/60이라는 유리수(분수)를 컴파일 시간 상수로 선언하면 다음과 같습니다.
using r1 = std::ratio<1, 60>;
r1 유리수의 분자와 분모는 컴파일 시간 상수이며, 다음과 같이 접근합니다.
intmax_t num{ r1::num }; intmax_t den{ r1::den };
ratio는 컴파일 시간 상수라는 것을 기억해야하며, 이는 분자와 분모가 컴파일 시간에 결정된다는 것을 의미합니다.
따라서 다음과 같이 작성하면 컴파일 에러가 발생합니다.
intmax_t n{ 1 }; intmax_t d{ 60 }; using r1 = ratio<n, d>; // Error
여기서 에러가 발생하지 않게 하려면 n과 d를 상수로 만들면 됩니다.
const intmax_t n{ 1 }; const intmax_t d{ 60 }; using r1 = ratio<n, d>; // OK
유리수는 항상 정규화(normalized, 약분)된 상태로 표현됩니다. 유리수 ratio<n, d>에 대해 최대 공약수가 gcd일 때, 분자 num과 분모 den은 다음과 같이 결정됩니다.
- num = sign(n) * sign(d) * abs(n) / gcd
- den = abs(d) * / gcd
ratio 라이브러리는 유리수의 덧셈, 뺄셈, 곱셈, 나눗셈을 지원합니다. 이 연산도 모두 컴파일 시간에 처리됩니다. 그래서 표준 산술 연산을 적용할 수 없고, 타입 앨리어스를 이용한 특수 템플리승로 처리해야 합니다. 이러한 용도로 제공되는 산술 ratio 템플릿으로는 ratio_add, ratio_subtract, ratio_multiply, ratio_divide가 있습니다. 이 템플릿들은 계산 결과를 새로운 ratio 타입으로 표현합니다. 이 타입은 C++에 정의된 type이라는 타입 앨리어스로 접근하는데, 예를 들어, 다음의 코드는 1/60과 1/30에 대한 ratio 값을 정의합니다. 그런 다음 ratio_add 템플릿으로 두 유리수를 더해서 result란 유리수를 구하는데 그 값은 결과를 약분한 1/20입니다.
using r1 = std::ratio<1, 60>; using r2 = std::ratio<1, 30>; using result = std::ratio_add<r1, r2>::type;
C++ 표준은 ratio 비교 연산 템플릿(ratio_equal, ratio_not_equal, ratio_less, ratio_less_equal, ratio_greater, ratio_greater_equal)도 제공합니다. 산술 ratio 템플릿과 마찬가지로 ratio 비교 연산 템플릿도 컴파일 시간에 처리됩니다.
이러한 비교 연산 템플릿은 결과를 표현하는 std::bool_constant란 타입을 새로 정의합니다. bool_constant는 타입과 컴파일 시간 상수값을 저장하는 struct 템플릿인 std::integral_constant 중 하나 입니다. 예를 들어 inttegral_constant<int, 15>는 15라는 정수값을 저장합니다. bool_constant는 bool 타입에 대한 integral_constant입니다. 예를 들어, bool_constant<true>는 trrue라는 부을 타입 값을 저장하는 integral_constant<bool, true> 입니다. ratio 비교 연산 템플릿의 결과는 bool_constant<true>나 bool_constant<false> 중 하나가 됩니다. bool_constant나 integral_constant에 대한 값은 value라는 데이터 멤버로 접근할 수 있습니다.
아래 코드는 ratio_less를 사용하는 방법을 보여줍니다.
#include <iostream> #include <ratio> int main() { using r1 = std::ratio<1, 60>; using r2 = std::ratio<1, 30>; using res = std::ratio_less<r2, r1>; std::cout << std::boolalpha << res::value << std::endl; }
아래 코드는 지금까지 설명한 모든 내용을 커버합니다. 여기서 ratio는 컴파일 시간 상수이기 때문에 std::cout << r1;과 같이 작성할 수 없고, 분자와 분모를 따로 구해서 하나씩 출력해야 합니다.
#include <iostream> #include <ratio> int main() { // Define a compile-time rational number using r1 = std::ratio<1, 60>; // Get numerator and denominator intmax_t num{ r1::num }; intmax_t den{ r1::den }; std::cout << "1) r1 = " << r1::num << "/" << r1::den << std::endl; // Add two rational numbers using r2 = std::ratio<1, 30>; std::cout << "2) r2 = " << r2::num << "/" << r2::den << std::endl; using result = std::ratio_add<r1, r2>::type; std::cout << "3) sum = " << result::num << "/" << result::den << std::endl; // Compare two rational numbers using res = std::ratio_less<r2, r1>; std::cout << "4) r2 < r1: " << std::boolalpha << res::value << std::endl; }
결과는 다음과 같습니다.

이 라이브러리는 편의를 위해서 다음과 같은 SI(System International, 국제단위계) 타입 앨리어스도 제공합니다.
// convenience SI typedefs typedef ratio<1, 1000000000000000000000000> yocto; typedef ratio<1, 1000000000000000000000> zepto; typedef ratio<1, 1000000000000000000> atto; typedef ratio<1, 1000000000000000> femto; typedef ratio<1, 1000000000000> pico; typedef ratio<1, 1000000000> nano; typedef ratio<1, 1000000> micro; typedef ratio<1, 1000> milli; typedef ratio<1, 100> centi; typedef ratio<1, 10> deci; typedef ratio< 10, 1> deca; typedef ratio< 100, 1> hecto; typedef ratio< 1000, 1> kilo; typedef ratio< 1000000, 1> mega; typedef ratio< 1000000000, 1> giga; typedef ratio< 1000000000000, 1> tera; typedef ratio< 1000000000000000, 1> peta; typedef ratio< 1000000000000000000, 1> exa; typedef ratio< 1000000000000000000000, 1> zetta; typedef ratio<1000000000000000000000000, 1> yotta;
여기 나온 SI 단위 중에서 yocto, zepto, zetta, yotta는 상수 분자와 분모를 intmax_t 타입으로 표현하는 컴파일러에만 정의되어 있습니다.
Duration
duration(기간)은 두 시점 사이의 시간 간격(interval)을 표현하는 클래스 템플릿으로서, 틱(tick)과 틱 주기(tick period)에 대한 값을 저장합니다. 틱 주기란 두 틱 사이의 초 단위 간격으로서 컴파일 시간 상수인 ratio로 표현합니다. 따라서 초를 분수로 표현한 것이라고 볼 수 있습니다.
duration 템플릿은 다음과 같이 두 가지 매개변수를 받도록 정의되어 있습니다.
template <class Rep, class Period = ratio<1>> class duration { ... }첫 번째 템플릿 매개변수 Rep는 틱 수를 저장하는 변수 타입이며, 반드시 산술 타입(예를 들어 long, double)으로 표현합니다. 두 번째 템플릿 매개변수인 Period는 유리수 상수로서 틱의 주기를 표현합니다. 틱의 주기를 지정하지 않으면 1초에 해당하는 디폴트 값인 ratio<1>이 적용됩니다.
생성자에는 3가지 버전이 있습니다. 디폴트 생성자와 틱 수에 대한 값 하나를 인수로 받는 생성자, 그리고 다른 duration을 인수로 받는 생성자가 있습니다. 예를 들어 분 단위로 표현한 duration을 초 단위로 변환하는 데 활용합니다. 구체적인 예는 뒤에서 소개하겠습니다.
duration은 +, -, *, /, %, ++, --, +=, -=, *=, /=, %=와 같은 산술 연산과 비교 연산(==, <=>)을 제공합니다. 이 클래스가 제공하는 메소드는 다음과 같습니다.
| METHOD | Description |
| Rep const() const | 틱 수를 표현하는 duration 값을 리턴합니다. 리턴 타입은 duration 템플릿 매개변수로 지정된 것을 사용합니다. |
| static duration zero() | 0에 해당하는 duration을 리턴합니다. |
| static duration min() static duration max() |
최대/최소 duration을 duration 템플릿의 매개변수로 지정한 타입의 값으로 리턴합니다. |
C++17부터는 floor(), ceil(), rount(), abs() 연산도 추가되었습니다. 동작 방식은 산술 연산의 방식과 같습니다.
그럼 이제 duration을 실제로 사용하는 방법을 살펴보겠습니다. 한 틱이 1초가 되도록 duration을 정의하면 다음과 같습니다.
std::chrono::duration<long> d1;디폴트 틱 주기가 ratio<1>이므로 위 문장은 다음과 같습니다.
std::chrono::duration<long, std::ratio<1>> d1;만약 틱 주기가 1분(60초)로 정의하려면 다음과 같이 작성합니다.
std::chrono::duration<long, std::ratio<60>> d2;틱 주기가 1/60초인 duration은 다음과 같이 정의합니다.
std::chrono::duration<double, std::ratio<1, 60>> d3;앞서 설명했듯이 <ratio>는 SI 유리수 상수도 다양하게 정의하고 있습니다. 이렇게 미리 정의된 상수를 사용하면 틱 주기를 간편하게 정의할 수 있습니다. 예를 들어 다음 코드는 틱 주기가 1ms인 duration을 정의합니다.
std::chrono::duration<long long, std::milli> d4;
다음 예제 코드는 duration을 정의하는 방법, duration에 대해 산술 연산을 수행하는 방법, duration을 다른 주기로 변환하는 방법을 보여줍니다.
#include <iostream> #include <chrono> int main() { // Specify a duration where each tick is 60 seconds std::chrono::duration<long, std::ratio<60>> d1{ 123 }; std::cout << d1.count() << std::endl; // Specify a duration represented by a double with each tick // equal to 1 second and assign the largest possible duration to it auto d2{ std::chrono::duration<double>::max() }; std::cout << d2.count() << std::endl; // Define 2 durations // For the first duration, each tick is 1 minuts // For the second duration, each tick is 1 second std::chrono::duration<long, std::ratio<60>> d3{ 10 }; // = 10 minuts std::chrono::duration<long, std::ratio<1>> d4{ 14 }; // = 14 seconds // Compare both durations if (d3 > d4) { std::cout << "d3 > d4\n"; } else { std::cout << "d3 <= d4\n"; } // Increment d4 with 1 resulting in 15 seconds ++d4; // Mutiply d4 by 2 resulting in 30 seconds d4 *= 2; // Add both duration and store as minutes std::chrono::duration<double, std::ratio<60>> d5{ d3 + d4 }; // Add both durations and store as seconds std::chrono::duration<long, std::ratio<1>> d6{ d3 + d4 }; std::cout << d3.count() << " minutes + " << d4.count() << " seconds = " << d5.count() << " minutes or " << d6.count() << " seconds\n"; // Create a duration of 30 seconds std::chrono::duration<long> d7{ 30 }; // Convert the seconds of d7 minutes std::chrono::duration<double, std::ratio<60>> d8{ d7 }; std::cout << d7.count() << " seconds = " << d8.count() << " minutes\n"; }
실행 결과는 다음과 같습니다.

위의 코드 중에서 다음 두 문장을 더 자세히 살펴보겠습니다.
// Add both duration and store as minutes std::chrono::duration<double, std::ratio<60>> d5{ d3 + d4 }; // Add both durations and store as seconds std::chrono::duration<long, std::ratio<1>> d6{ d3 + d4 };
둘다 d3+d4를 구하지만, 첫 번째는 결과를 분 단위로 표현하는 부동소수점 수로 저장했고, 두 번째는 초 단위로 표현하는 정수로 저장했습니다. 분 단위와 초 단위에 대한 상호 변환은 자동으로 처리됩니다.
위의 예제 코드에서 다음 두 문장은 서로 단위가 다른 duration을 변환하는 방법을 보여줍니다.
// Create a duration of 30 seconds std::chrono::duration<long> d7{ 30 }; // Convert the seconds of d7 minutes std::chrono::duration<double, std::ratio<60>> d8{ d7 };
첫 번째는 30초에 대한 duration을 정의합니다. 두 번째는 30초를 분 단위로 변환합니다. 결과는 0.5분 입니다. 초 단위를 분 단위로 변환하면 결과가 비정수(non-integral) 값으로 표현됩니다. 그래서 부동소수점 타입을 표현하는 duration을 사용해야 합니다. 그렇지 않으면 컴파일 에러가 발생하는데 이때, 에러 메세지의 내용이 불분명할 수 있습니다.
다음의 문장은 컴파일 에러가 발생하는데, d8이 부동소수점이 아닌 long 타입 값을 표현하기 때문입니다.
std::chrono::duration<long> d7{ 30 }; std::chrono::duration<long, std::ratio<60>> d8{ d7 };
하지만 duration_cast()를 활용하면 타입을 강제로 변환할 수 있습니다.
std::chrono::duration<long> d7{ 30 }; // seconds auto d8{ std::chrono::duration_cast<duration<long, ratio<60>>>(d7) }; // minutes
이때 d8은 0분이 되는데, 30초를 분 단위로 변환할 때 정수 나눗셈이 적용되었기 때문입니다.
분 단위를 초 단위로 변환할 때는 원본 타입이 정수라면 부동소수점 타입으로 지정하지 않아도 됩니다. 정수로 표현된 분 단위 값을 초 단위로 변환할 때는 항상 결과가 정수이기 때문입니다. 예를 들어, 다음 코드는 10분을 초 단위로 변환합니다. 둘 다 정수 타입인 long으로 지정했습니다.
std::chrono::duration<long, std::ratio<60>> d9{ 10 }; // minutes std::chrono::duration<long> d10{ d9 }; // seconds
라이브러리는 std::chrono 네임스페이스에서 다음의 표준 duration 타입들도 제공합니다.
using nanoseconds = duration<X 64 bits, nano>; using microseconds = duration<X 55 bits, micro>; using milliseconds = duration<X 45 bits, milli>; using seconds = duration<X 35 bits>; using minutes = duration<X 29 bits, ratio<60>>; using hours = duration<X 23 bits, ratio<3'600>>;
C++ 20부터는 다음의 타입들도 제공합니다.
using days = duration<X 25 bits, ratio_multiply<ratio<24>, hours::period>>; using weeks = duration<X 22 bits, ratio_multiply<ratio<7>, days::period>>; using years = duration<X 17 bits, ratio_multiply<ratio<146'097, 400>, days::period>>; using months = duration<X 20 bits, ratio_divide<years::period, ratio<12>>>;
여기서 X에 대한 구체적인 타입은 컴파일러마다 다르지만, C++ 표준에 따르면 여기에 명시된 최소 크기를 담을 수 있는 부호 있는 정수로 지정해야 합니다. 이러한 타입 엘리어스는 앞 절에서 소개한 SI ratio 타입 앨리어스를 활용할 수 있습니다.
예를 들어 다음과 같이 작성하는 대신
std::chrono::duration<long, std::ratio<60>> d9{ 10 }; // minutes다음과 같이 간단히 표현할 수 있습니다.
std::chrono::minutes d9{ 10 }; // minutes
미리 정의된 duration을 사용하는 예제 코드를 조금 더 살펴보겠습니다. 아래 코드는 먼저 t라는 변수를 정의하는데, 여기서 1시간 + 23분 + 45초의 결과를 저장합니다. auto 키워드를 붙였기 때문에 t의 구체적인 타입은 컴파일러가 결정합니다. 두 번째 문장은 seconds라는 duration의 생성자를 호출하여 t값을 초 단위로 변환한 뒤 그 결과를 콘솔에 출력합니다.
auto t{ std::chrono::hours{ 1 } + std::chrono::minutes{ 23 } + std::chrono::seconds{ 45 } }; std::cout << std::chrono::seconds{ t }.count() << " seconds\n";

표준에 따르면 이렇게 기본 제공되는 duration이 정수 타입을 사용하기 때문에 변환된 결과를 정수로 표현할 수 없으면 에러가 발생할 수 있습니다. 정수 나눗셈의 결과로 발생한 나머지는 대부분 버리지만 ratio 타입으로 구현된 duration에 대해서는 0이 아닌 나머지가 나올 여지가 조금이라도 있는 연산을 컴파일 에러로 처리합니다.
예를 들어, 다음과 같이 작성하면 컴파일 에러가 발생합는데, 90초를 분 단위로 변환하면 1.5분이 되기 때문입니다.
std::chrono::seconds s{ 90 }; std::chrono::minutes m{ s };
그런데, 다음과 같이 60초가 정확히 1분으로 나누어떨어지더라도 컴파일 에러가 발생합니다. 초 단위를 분 단위로 변환하는 과정에서 원칙적으로 비정수 결과가 나올 가능성이 있기 때문입니다.
std::chrono::seconds s{ 60 }; std::chrono::minutes m{ s };
반대로 분 단위를 초 단위로 변환하는 것은 정상적으로 동작합니다. 정수 타입의 분 단위를 초 단위로 변환했을 때, 변환된 초 단위 값도 항상 정수이기 때문입니다.
duration을 생성할 때 표준 사용자 정의 리터럴인 'h', 'min', 's', 'ms', 'us', 'ns' 등을 붙일 수 있습니다. 이러한 리터럴은 std::literals::chrono_literals 네임스페이스에 정의되어 있습니다만, using namespace std::chrono로도 접근할 수 있습니다. 예를 들면 다음과 같습니다.
using namespace std::chrono; // ... auto myDuration { 42min };
C++20부터는 hh_mm_ss 클래스 템플릿이 chrono 라이브러리에 추가되었습니다. 이는 시간, 분, 초, subseconds로 분리된 각각의 Duration을 받아서 생성됩니다. 생성된 객체로 hours(), minutes(), seconds(), subseconds() getter로 데이터를 확인할 수 있습니다.
Clock
clock은 time_point와 duration으로 구성된 클래스입니다. time_point 타입은 뒤에서 조금 더 자세히 설명하도록 하고, 이에 대해서 구체적으로 몰라도 clock의 작동 방식을 이해하는 데 문제가 없습니다. 하지만 time_point가 clock에 의존하기 때문에 clock의 세부사항부터 먼저 알아보겠습니다.
C++ 표준은 clock을 세 가지 버전으로 정의합니다. 첫 번째 버전은 system_clock으로 시스템 관점의 실시간 클럭을 표현합니다. 두 번째 버전은 steady_clock으로서 time_point가 절대로 감소하지 않도록 보장해줍니다. 참고로 system_clock은 언제든지 조정할 수 있기 때문에 time_point가 감소되지 않도록 보장해주지 않습니다. 세 번째 버전은 high_resolution_clock으로서 최소 틱 주기를 가집니다. 현재 컴파일러의 종류에 따라 high_resolution_clock이 steady_clock이나 system_clock과 같을 수 있습니다.
C++20 에서는 utc_clock, tai_clock, gps_clock, file_clock이 추가되었습니다. 조금 더 고급 clock이며 이번 포스팅에서는 다루지 않도록 하겠습니다 !
각 버전의 clock에는 now()라는 static 메소드가 있는데, 이 메소드는 현재 시각을 time_point로 리턴합니다. system_clock은 time_point와 time_t 타입의 C 스타일 시간을 상호 변환하는 static 헬퍼 함수도 두 개 제공합니다. 하나는 to_time_t()로서 인수로 전달한 time_point를 time_t 값으로 변환하고, 다른 하나는 from_time_t()로서 인수로 전달한 time_t 값으로 초기화한 time_point를 리턴합니다. time_t 타입은 <ctime> 헤더 파일에 정의되어 있습니다.
다음 예제는 시스템에서 현재 시각을 알아내고 사람이 읽을 수 있는 형태로 변환해서 콘솔에 출력하는 과정을 보여줍니다. 여리서 localtime_s() 함수(localtime())는 time_t 값을 현지 시각(tm)으로 변환합니다. 이 함수는 <ctime> 헤더 파일에 정의되어 있습니다. put_time() 스트림 매니퓰레이터는 <iomanip> 헤더에 정의되어 있습니다.
#include <iostream> #include <chrono> #include <iomanip> int main() { // Get current time as a time_point std::chrono::system_clock::time_point tpoint{ std::chrono::system_clock::now() }; // Conver to a time_t time_t tt{ std::chrono::system_clock::to_time_t(tpoint) }; // Conver to local time tm t{}; localtime_s(&t, &tt); // Write the time to the console std::cout << std::put_time(&t, "%H:%M:%S") << std::endl; }
시간을 스트링으로 변환하려면 <ctime>에 정의된 C 스타일 strftime() 함수나 std::stringstream을 사용합니다. strftime() 함수를 사용하려면 주어진 시간을 사람이 읽기 좋은 포맷으로 변환한 결과를 충분히 담을 정도로 큰 버퍼를 지정해야 합니다.
#include <iostream> #include <chrono> #include <iomanip> #include <sstream> int main() { // Get current time as a time_point std::chrono::system_clock::time_point tpoint{ std::chrono::system_clock::now() }; // Conver to a time_t time_t tt{ std::chrono::system_clock::to_time_t(tpoint) }; // Conver to local time tm t{}; localtime_s(&t, &tt); // Convert to readable format std::stringstream ss; ss << std::put_time(&t, "%H:%M:%S"); std::string stringTime{ ss.str() }; std::cout << stringTime << std::endl; // Or char buffer[80]{ 0 }; strftime(buffer, sizeof(buffer), "%H:%M:%S", &t); std::cout << buffer << std::endl; }
위 예제에서 localtime()을 호출할 때는 보안 에러나 경고 메세지가 발생할 수 있어서, localtime_s()를 사용했습니다. MSVC에서는 localtime_s()를 사용하고, 리눅스 버전은 localtime_r()을 사용해야 합니다.
chrono 라이브러리는 특정한 코드 영역을 실행하는데 걸리는 시간을 알려주는 기능도 제공합니다. 사용법은 다음과 같습니다. 여기서 start와 end에 대한 구체적인 타입은 high_resolution_clock::time_point이고, diff의 타입은 duration입니다.
#include <iostream> #include <chrono> int main() { // Get the start time auto start{ std::chrono::high_resolution_clock::now() }; // Excute code that you want to time double d{ 0 }; for (int i = 0; i < 1'000'000; i++) { d += sqrt(sin(i) * cos(i)); } // Get the end time and calculate the difference auto end{ std::chrono::high_resolution_clock::now() }; auto diff{ end - start }; // Convert the difference into milliseconds and output to the console std::cout << std::chrono::duration<double, std::milli>{ diff }.count() << "ms\n"; }
위 코드에서 측정할 코드 안에 있는 sqrt(), sin(), cos()과 같은 몇 가지 산술 연산이 금방 끝나지 않도록 루프문으로 작성했습니다. 이 코드를 실행하는 시스템에서 ms 단위의 시간차가 너무 작으면 정확도가 떨어집니다. 이럴 때는 실행 시간이 길어지도록 루프의 반복 횟수를 늘려야 합니다.
이렇게 시간 간격이 짧을 때 정확도가 떨어지는 이유는 대다수의 os가 밀리초 단위를 지원하기는 하지만 갱신 주기가 10ms나 15ms 정도로 다소 길기 때문입니다. 그래서 타이머의 한 틱보다 짧은 단위로 발생한 이벤트는 0 단위 시간으로 보이고, 1에서 2틱 사이에 발생한 이벤트가 1 단위 시간으로 보이는 게이팅 에러(gating error)가 발생합니다.
예를 들어 15ms 주기로 타이머를 갱신하는 시스템에서 44ms가 걸리는 루프의 실행 시간은 30ms로 나옵니다. 이런 타이머로 시간을 측정할 때는 반드시 대상 연산의 실행 시간을 타이머의 최소 틱 단위보다 크게 구성해야 오차를 최소화할 수 있습니다.
Time Point
time_point는 특정한 시점을 표현하는 클래스로서 에포크(epoch, 기준시간)를 기준으로 측정한 duration으로 저장합니다. time_point는 항상 특정한 clock을 기준으로 표현하는데, 이 clock의 시작 시간이 에포크가 됩니다. 예를 들어 기존 유닉스/리눅스 시간에 대한 에포크는 1970년 1월 1일이고, duration은 초 단위로 측정합니다. 윈도우 시스템의 에포크는 1601년 1월 1일이고, duration을 100나노초 단위로 측정합니다. 에포크와 duration은 OS마다 다를 수 있습니다.
time_point 클래스는 time_since_epoch()라는 함수를 제공합니다. 이 함수는 clock의 에포크와 저장된 시점 사이의 duration을 리턴합니다.
time_point와 이에 따른 duration에 대한 산술 연산도 제공됩니다. 다음 표는 이러한 산술 연산의 종류를 보여줍니다. 여기서 tp는 time_point 값이고, d는 duration 입니다.
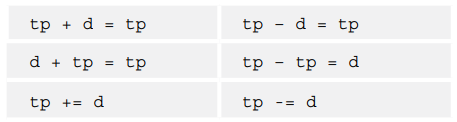
tp + tp 연산은 지원하지 않습니다.
두 시점을 비교하는 비교 연산자(==, <=>)도 지원합니다. 이를 위해 최소 시점을 리턴하는 min()과 최대 시점을 리턴하는 max()라는 static 메소드가 있습니다.
time_point 클래스의 생성자에는 세 가지 버전이 있습니다.
- time_point(): duration::zero()로 초기화한 time_point를 생성합니다. 결과로 나오는 time_point는 기준이 되는 clock의 에포크를 표현합니다.
- time_point(const duration& d): 인수로 지정한 duration으로 초기화한 time_point를 생성합니다. 결과로 나오는 time_point는 epoch + d입니다.
- template<class Duration2> time_point(const time_point<clock, Duration2>& t): t.time_since_epoch()로 초기화된 time_epoch를 생성합니다.
각 time_point는 clock에 연계되어 있습니다. time_point를 생성하려면 템플릿 매개변수에 clock을 지정해주어야 합니다.
time_point<steady_clock> tp1;각 clock은 time_point 타입을 알고 있기 때문에 다음과 같이 작성해도 됩니다.
steady_clock::time_point tp1;
time_point 클래스를 사용하는 방법은 다음과 같습니다.
#include <iostream> #include <chrono> int main() { // Create a time_point represeting the epoch of the associated steady clock std::chrono::time_point<std::chrono::steady_clock> tp1; // Add 10 minutes to the time_point tp1 += std::chrono::minutes{ 10 }; // Store the duration between epoch and time_point auto d1{ tp1.time_since_epoch() }; std::chrono::duration<double> d2{ d1 }; std::cout << d2.count() << " seconds\n"; }
위 코드를 실행하면 "600 seconds"가 출력됩니다.
time_point를 변환하는 작업은 duration과 마찬가지로 명시적으로 할 수도 있고, 자동으로 할 수도 있습니다. 자동으로 변환하는 예는 다음과 같습니다. 이 코드의 실행 결과는 42000 ms입니다.
#include <iostream> #include <chrono> using namespace std::chrono; int main() { time_point<steady_clock, seconds> tpSeconds{ 42s }; // Convert seconds to miliseconds explicitly time_point<steady_clock, milliseconds> tpMilliseconds{ tpSeconds }; std::cout << tpMilliseconds.time_since_epoch().count() << "ms\n"; }
자동 변환으로 인해 데이터 손실이 발생한다면 time_point_cast()로 명시적으로 변환합니다. 이는 duration을 duration_cast()로 변환할 때와 같습니다. 다음 코드는 42424ms로 시작했지만 42000ms라는 결과를 출력합니다.
#include <iostream> #include <chrono> using namespace std::chrono; int main() { time_point<steady_clock, milliseconds> tpMilliseconds{ 42'424ms }; // Convert miliseconds to seconds explicitly time_point<steady_clock, seconds> tpSeconds{ time_point_cast<seconds>(tpMilliseconds) }; // Or: // auto tpSeconds{ time_point_cast<seconds>(tpMilliseconds) }; // Convert seconds back to miliseconds and output the result milliseconds ms{ tpSeconds.time_since_epoch() }; std::cout << ms.count() << "ms\n"; }
C++17부터 time_point에 대한 floor(), ceil(), rount() 연산이 추가되었습니다. 동작 방식은 기존 산술 연산과 같습니다.
'프로그래밍 > C & C++' 카테고리의 다른 글
| [C++] 템플릿(Template) 심화편 (1) (0) | 2022.03.01 |
|---|---|
| [C++] 난수(random number) - random 라이브러리 (0) | 2022.02.28 |
| [C++] String Localization (0) | 2022.02.27 |
| [C++] 알고리즘 (Algorithms) (3) (0) | 2022.02.26 |
| [C++] 알고리즘 (Algorithms) (2) (0) | 2022.02.26 |


댓글