(tensorflow v2.4.0)
일반적으로 딥러닝 모델을 학습할 때, Build in Solution인 model.compile()과 model.fit()을 많이 사용합니다.
model.compile()을 통해서 optimizer와 loss를 지정하고, model.fit()을 통해서 training data의 batches를 통해 학습을 반복(loop) 합니다.
tensorflow에서는 model.compile과 model.fit을 사용해 학습할 수도 있지만, 직접 train loop를 구성해서 Custom Training의 방법으로도 학습이 가능합니다.

Custom Training Loops를 구성할 때에는 여러 가지 작업이 필요한데,
1)training data의 batches를 관리, 2)model의 예측값으로 loss 계산, 3)loss의 최적화 과정, 4)parameter(weight) 업데이트의 작업을 구현해야합니다.
아래의 과정을 기본으로 예제를 통해서 어떻게 Custom Training Loops로 학습을 수행할 수 있는지 알아본 후에, Fashion MNIST dataset을 가지고 custom training을 진행해보겠습니다.

Custom Training Loops Example
1. Define the network
기본적으로 input x를 가지고, output y = wx + b를 출력하는 네트워크를 구성하겠습니다. weights와 bias는 각각 2, 1로 초기화하였습니다.
import tensorflow as tf
import numpy as np
import matplotlib.pyplot as plt

class Model():
    def __init__(self):
        self.w = tf.Variable(2.0)
        self.b = tf.Variable(1.0)

    def __call__(self, x):
        return self.w * x + self.b

model = Model()
2. Training Data
# Obtain training data
TRUE_w = 3.0
TRUE_b = 2.0
NUM_EXAMPLES = 1000

xs = tf.random.normal(shape=[NUM_EXAMPLES])
ys = (TRUE_w * xs) + TRUE_b
목표로 하는 w와 b는 3, 2로 설정하고, 랜덤하게 x를 선택해 1000개의 (x, y) set의 dataset을 생성하였습니다.
3. Define loss
loss는 L2 Loss를 사용하며, 함수로 정의합니다.
\[\mathscr{L}(y_{true}, y_{pred}) = \frac{\sum_{i}(y_{true} - y_{pred})^2}{\text{n_samples}}\]
def L2_loss(y_true, y_pred):
    return tf.reduce_mean(tf.square(y_true - y_pred))
학습을 시작하기 전에, 훈련되지않은 모델의 예측값을 그래프로 확인해보도록 하겠습니다. 초기 w와 b가 2, 1이기 때문에 2x + 1의 결과를 얻을 것입니다.
def plot_data(inputs, outputs, predicted_outputs):
    real = plt.scatter(inputs, outputs, c='b', marker='.')
    predicted = plt.scatter(inputs, predicted_outputs, c='r', marker='+')
    plt.legend((real, predicted), ('Real Data', 'Predicted Data'))
    plt.show()

plot_data(xs, ys, model(xs))
print(f'Current loss : {L2_loss(model(xs), ys).numpy():1.6f}')
4. Train the model
이제 train loop를 정의하고, 학습을 진행해보겠습니다.
# Define a training loop
def train(model, inputs, outputs, learning_rate):
    with tf.GradientTape() as t:
        current_loss = L2_loss(model(inputs), outputs)
    dw, db = t.gradient(current_loss, [model.w, model.b])

    # update gradient
    model.w.assign_sub(learning_rate * dw)
    model.b.assign_sub(learning_rate * db)

    return current_loss
하나의 loop에서의 진행은 다음과 같습니다.
1. model의 예측값(y_pred) 계산
2. 실제값(y_true)과의 loss 계산
3. loss에 대한 parameter들의 gradient 계산
4. parameter 업데이트
여기서 gradient는 tf.GradientTape()를 사용해서 계산합니다. tf.GradientTape에 관한 내용과 사용법은 다음에 간단히 정리해보도록 하겠습니다.
list_w, list_b = [], []
epochs = range(15)
losses = []
for epoch in epochs:
    list_w.append(model.w.numpy())
    list_b.append(model.b.numpy())
    current_loss = train(model, xs, ys, learning_rate=0.1)
    losses.append(current_loss)
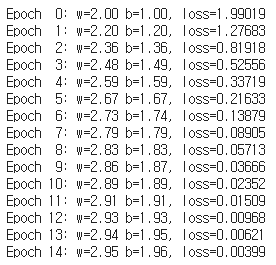
    print(f'Epoch {epoch:2d}: w={list_w[-1]:1.2f} b={list_b[-1]:1.2f}, loss={current_loss:2.5f}')
15 epoch 동안의 학습 결과입니다. w, b의 값이 3과 2에 가까워지고 있는 모습을 볼 수 있습니다.
plt.plot(epochs, list_w, 'r',
         epochs, list_b, 'b')
plt.plot([TRUE_w] * len(epochs), 'r--',
         [TRUE_b] * len(epochs), 'b--')
plt.legend(['w', 'b', 'TRUE_w', 'TRUE_b'])
plt.show()
5. Validate the model
마지막으로 새로운 test data를 생성하여, 모델을 평가해보도록 하겠습니다.
# Obtain test data
test_inputs  = tf.random.normal(shape=[NUM_EXAMPLES])
test_outputs = test_inputs * TRUE_w + TRUE_b

# Evaluate
predicted_test_outputs = model(test_inputs)
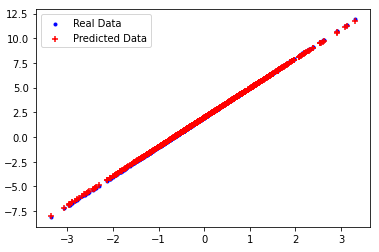
plot_data(test_inputs, test_outputs, predicted_test_outputs)
실제값과 거의 동일하게 예측하는 모습을 보여주고 있습니다.
아래 그래프는 가중치 변화에 따른 loss 추이를 보여주고 있습니다.

이렇게 위 과정을 거쳐서 Custom Training Loop를 구성하여 모델을 학습할 수 있습니다.
이제 Fashion MNIST dataset과 위 방법을 사용하여 Fashion MNIST를 분별하는 모델을 학습해보겠습니다.
Fashion MNIST network 구현
Load data and preprocess
먼저 tensorflow_dataset을 import하고 fashion MNIST dataset을 가져옵니다.
import tensorflow_datasets as tfds
train_data, info = tfds.load("fashion_mnist", split = "train", with_info = True)
test_data = tfds.load("fashion_mnist", split = "test")

class_names = ["T-shirt/top", "Trouser/pants", "Pullover shirt", "Dress", "Coat", "Sandal", "Shirt", "Sneaker", "Bag", "Ankle boot"]
그리고, data의 전처리 과정을 진행해주기 위한 함수를 정의하고, Dataset의 map 메소드를 통해서 전처리를 진행합니다.
def format_image(data):
    image = data["image"]
    image = tf.reshape(image, [-1])
    image = tf.cast(image, 'float32')
    image = image / 255.0
    return image, data["label"]

train_data = train_data.map(format_image)
test_data = test_data.map(format_image)
입력 이미지를 1차원 벡터로 변환해주고, normalization을 수행해주었습니다.
batch size는 64로 설정하고, train/test dataset을 랜덤하게 섞어줍니다.
batch_size = 64
train = train_data.shuffle(buffer_size=1024).batch(batch_size)
test = test_data.batch(batch_size=batch_size)
Define the model
학습에 사용할 모델을 구성합니다. 기본적인 Dense layer로만 구성된 네트워크이며, 마지막에 'softmax' output으로 각 라벨에 대한 확률을 출력합니다.
# Define Network
def base_model():
    inputs = tf.keras.Input(shape=(784, ), name='clothing')
    x = tf.keras.layers.Dense(64, activation='relu', name='dense_1')(inputs)
    x = tf.keras.layers.Dense(64, activation='relu', name='dense_2')(x)
    outputs = tf.keras.layers.Dense(10, activation='softmax', name='predictions')(x)
    model =  tf.keras.Model(inputs=inputs, outputs=outputs)
    return model
Define optimizer / loss function / metrics
학습에 사용할 최적화 알고리즘 / Loss 함수 / 그리고 모델의 정확도를 평가할 수 있는 metric 함수를 정의합니다.
metric의 사용은 아래에서 언급하도록 하겠습니다.
optimizer = tf.keras.optimizers.Adam()
loss_fn = tf.keras.losses.SparseCategoricalCrossentropy()

train_acc_metrics = tf.keras.metrics.SparseCategoricalAccuracy()
valid_acc_metrics = tf.keras.metrics.SparseCategoricalAccuracy()
Building training loop
training loop를 구성하기 위한 함수들을 정의하도록 하겠습니다.
def apply_gradient(model, optimizer, loss_fn, x, y):
    with tf.GradientTape() as t:
        logits = model(x)
        loss = loss_fn(y, logits)
    gradients = t.gradient(loss, model.trainable_weights)
    optimizer.apply_gradients(zip(gradients, model.trainable_weights))

    return logits, loss
apply_gradient 함수를 통해 model의 output과 실제값으로 loss를 계산하고, gradient를 구해서 파라미터를 업데이트합니다.
다음은 한 epoch를 수행하는 loop 함수입니다. for문을 통해서 train_data의 batch들을 뽑아서 학습을 진행합니다.
11 line에서 train_acc_metrics(y_batch, logits)를 통해서 정확도를 측정하여 저장합니다.
from tqdm import tqdm

def train_data_for_one_epoch(train_data, model, optimizer, loss_fn, train_acc_metrics):
    losses = []
    pbar = tqdm(total=len(list(enumerate(train_data))), position=0, leave=True, bar_format='{l_bar}{bar}l {n_fmt}/{total_fmt} ')
    for step, (x_batch, y_batch) in enumerate(train_data):
        logits, loss = apply_gradient(model, optimizer, loss_fn, x_batch, y_batch)

        losses.append(loss)

        train_acc_metrics(y_batch, logits)
        pbar.set_description(f"Training loss for step {step}: {loss:.4f}")
        pbar.update()
    return losses
마지막으로 validation을 위한 함수입니다.
def perform_validation(test_data, model, loss_fn, valid_acc_metrics):
    losses = []
    for x_val, y_val in test_data:
        val_logits = model(x_val)
        val_loss = loss_object(y_val, val_logits)
        losses.append(val_loss)
        valid_acc_metrics(y_val, val_logits)
    return losses
Training the model
이제 학습을 진행해보도록 하겠습니다.
model = base_model()

# Iterate over epochs.
epochs = 10
epochs_val_losses, epochs_train_losses = [], []
for epoch in range(epochs):
    print(f'Start of epoch {epoch}')

    losses_train = train_data_for_one_epoch(train, model, optimizer, loss_fn, train_acc_metrics)
    train_acc = train_acc_metrics.result()

    losses_val = perform_validation(test, model, loss_fn, valid_acc_metrics)
    val_acc = valid_acc_metrics.result()

    losses_train_mean = np.mean(losses_train)
    losses_val_mean = np.mean(losses_val)
    epochs_val_losses.append(losses_val_mean)
    epochs_train_losses.append(losses_train_mean)

    print('\n Epoch %s: Train loss: %.4f  Validation Loss: %.4f, Train Accuracy: %.4f, Validation Accuracy %.4f' % (epoch, float(losses_train_mean), float(losses_val_mean), float(train_acc), float(val_acc)))

    train_acc_metrics.reset_states()
    valid_acc_metrics.reset_states()
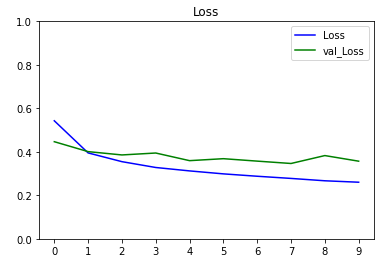
총 10번의 epoch를 통해서 90%의 train acc와 87%의 valid acc를 달성하였습니다.
import matplotlib.ticker as mticker

def plot_metrics(train_metric, valid_metric, metric_name, title, ylim=5):
    plt.title(title)
    plt.ylim(0, ylim)
    plt.gca().xaxis.set_major_locator(mticker.MultipleLocator(1))
    plt.plot(train_metric, color='blue', label=metric_name)
    plt.plot(valid_metric, color='green', label='val_' + metric_name)
    plt.legend()

plot_metrics(epochs_train_losses, epochs_val_losses, "Loss", "Loss", ylim=1.0)
Evaluate the model
test data를 사용해서 결과가 어떻게 나오는지 살펴보겠습니다. 결과 이미지를 출력하기 위한 display_image 함수를 정의하고, test data 중에서 임의로 10개를 선정하여서 결과를 살펴보겠습니다.
def display_images(image, predictions, labels, title, n):
    display_strings = [str(i) + "\n\n" + str(j) for i, j in zip(predictions, labels)]

    plt.figure(figsize=(17,3))
    plt.title(title)
    plt.yticks([])
    plt.xticks([28*x + 14 for x in range(n)], display_strings)
    plt.grid(False)

    image = np.reshape(image, (n, 28, 28))
    image = np.swapaxes(image, 0, 1)
    image = np.reshape(image, (28, 28*n))
    plt.imshow(image

test_inputs = test_data.batch(batch_size=1000001)
x_batches, y_batches, y_true_batches = [], [], []

for x, y in test_inputs:
    y_pred = model(x)
    y_pred_batches = y_pred.numpy()
    y_true_batches = y.numpy()
    x_batches = x.numpy()

indexes = np.random.choice(len(y_pred_batches), size=10)
images_to_plot = x_batches[indexes]
y_pred_to_plot = y_pred_batches[indexes]
y_true_to_plot = y_true_batches[indexes]

y_pred_labels = [class_names[np.argmax(sel_y_pred)] for sel_y_pred in y_pred_to_plot]
y_true_labels = [class_names[sel_y_true] for sel_y_true in y_true_to_plot]
display_images(images_to_plot, y_pred_labels, y_true_labels, "Predicted and True Values", 10)

대부분 잘 예측하고 있으나, 위쪽 4, 6번째 이미지는 Coat이지만 Shirt로 잘못 예측하고 있습니다. 아래의 6번째 이미지도 Pullover shirt이지만 Shirt로 예측하고 있으며, 8번째 Sandal은 Ankle boot로 잘못 예측하고 있습니다.
- 참고
Coursera - Custom and Distributed Training with Tensorflow : Week2
'ML & DL > tensorflow' 카테고리의 다른 글
| Breast Cancer Prediction (0) | 2021.01.13 |
|---|---|
| [tensorflow] GradientTape (0) | 2021.01.12 |
| [tensorflow] Custom Model (Mini ResNet, VGGNet 구현) (1) | 2021.01.12 |
| [tensorflow] Custom Lambda layer / Custom layer (0) | 2021.01.11 |
| [tensorflow] Custom Loss (Huber Loss, Contrastive Loss 구현) (0) | 2021.01.11 |


댓글