(tensorflow v2.4.0)
이번에는 IMDB dataset 분류에 이어서 한글로 된 영화 리뷰 데이터를 사용해서 감성 분석을 진행해보도록 하겠습니다.
데이터는 아래 github을 참조하시면 됩니다.
1. 데이터 불러오기
필요한 패키지들을 import하고, github에 있는 데이터를 불러옵니다. train_text의 처음 300자를 확인해보면 id, review, label로 구성된 것을 확인할 수 있습니다.
import tensorflow as tf
import numpy as np
import matplotlib.pyplot as plt

path_to_train_file = tf.keras.utils.get_file('train.txt', 'https://raw.githubusercontent.com/e9t/nsmc/master/ratings_train.txt')
path_to_test_file = tf.keras.utils.get_file('test.txt', 'https://raw.githubusercontent.com/e9t/nsmc/master/ratings_test.txt')

train_text = open(path_to_train_file, 'rb').read().decode(encoding='utf-8')
test_text = open(path_to_test_file, 'rb').read().decode(encoding='utf-8')

print(f'Length of text: {len(train_text)} characters')
print(f'Length of text: {len(test_text)} characters')

print(train_text[:300])
각 columns은 Tab으로 구분되어 있기 때문에, '\n'을 통해서 line별로 분리해주고, '\t'을 통해서 각 columns별 데이터로 분리해줍니다.
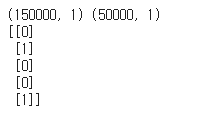
우선 label data부터 분리하도록 하겠습니다.
train_y = np.array([[int(row.split('\t')[2])] for row in train_text.split('\n')[1:] if row.count('\t') > 0])
test_y = np.array([[int(row.split('\t')[2])] for row in test_text.split('\n')[1:] if row.count('\t') > 0])
print(train_y.shape, test_y.shape)
print(train_y[:5])
데이터 전처리
다음으로 input text로 사용할 데이터를 전처리하도록 하겠습니다.
import re

def clean_str(string):
    string = re.sub(r"[^가-힣A-Za-z0-9(),!?\'\`]", " ", string)
    string = re.sub(r"\'s", " \'s", string)
    string = re.sub(r"\'ve", " \'ve", string)
    string = re.sub(r"n\'t", " n\'t", string)
    string = re.sub(r"\'re", " \'re", string)
    string = re.sub(r"\'d", " \'d", string)
    string = re.sub(r"\'ll", " \'ll", string)
    string = re.sub(r",", " , ", string)
    string = re.sub(r"!", " ! ", string)
    string = re.sub(r"\(", " \( ", string)
    string = re.sub(r"\)", " \) ", string)
    string = re.sub(r"\?", " \? ", string)
    string = re.sub(r"\s{2,}", " ", string)
    string = re.sub(r"\'{2,}", "\'", string)
    string = re.sub(r"\'", "", string)

    return string.lower()

train_text_x = [row.split('\t')[1] for row in train_text.split('\n')[1:] if row.count('\t') > 0]
train_text_x = [clean_str(sentence) for sentence in train_text_x]

sentences = [sentence.split(' ') for sentence in train_text_x]
for i in range(5):
    print(sentences[i])
정규표현식을 사용해서 불필요한 특수문자들을 제거했습니다.
그리고, label을 분류할 때와 동일하게 '\n', '\t'를 통해서 각 리뷰를 뽑아냈습니다.
sentence_len = [len(sentence) for sentence in sentences]
sentence_len.sort()
plt.plot(sentence_len)
plt.show()

print(sum([int(l <= 25) for l in sentence_len]))
각 문장들이 가지고 있는 단어 갯수(토큰)를 시각화하였습니다. 토큰이 가장 많은 문장은 88개의 단어를 갖고 있습니다.
25개로 제한한 후에 총 토큰의 수는 142587개 입니다.
모델의 입력은 모두 동일한 길이의 시퀀스 데이터가 되어야 하기 때문에, 총 25 시퀀스의 데이터로 모두 변경합니다.
sentences_new = []
for sentence in sentences:
    sentences_new.append([word[:5] for word in sentence][:25])
sentences = sentences_new
for i in range(5):
    print(sentences[i])
그리고, tensorflow의 Tokenizer를 통해서 최대 2만개의 단어를 사용해서 인덱스로 변환시켜주는 토큰화 작업을 수행합니다. 그리고, pad_sequences 함수를 통해서 25보다 짧은 시퀀스 데이터는 나머지 부분을 0으로 채워줍니다.
from tensorflow.keras.preprocessing.text import Tokenizer
from tensorflow.keras.preprocessing.sequence import pad_sequences

tokenizer = Tokenizer(num_words=20000)
tokenizer.fit_on_texts(sentences)
train_x = tokenizer.texts_to_sequences(sentences)
train_x = pad_sequences(train_x, padding='post')

print(train_x[:5])
3번째 시퀀스 데이터가 모두 0인 이유는 '너무재밓었'이라는 단어가 빈도수가 너무 낮아 2만개의 단어에 포함되지 않아서 토큰화되지 않았기 때문입니다. 이처럼, voca에 존재하지 않는 단어는 모두 0으로 토큰화됩니다.
Tokenizer의 동작을 확인해보도록 하겠습니다.
print(tokenizer.index_word[19999])
print(tokenizer.index_word[20000])
temp = tokenizer.texts_to_sequences(['#$#$#', '경우는', '잊혀질', '연기가'])
print(temp)
temp = pad_sequences(temp, padding='post')
print(temp)
우리는 2만개의 단어만을 사용하기로 했기 때문에, 19999번째 단어까지만 사용하게 됩니다. 따라서 Tokenizer에서 토큰화는 모든 단어에 대해서 진행하지만, texts_to_sequences로 변환하게 되면, '잊혀질'이라는 단어는 0으로 토큰화되는 것을 확인할 수 있습니다.
2. 모델 정의 및 학습
단순히 LSTM layer를 사용해서 모델을 정의하였습니다.
model = tf.keras.Sequential([
    tf.keras.layers.Embedding(20000, 300, input_length=25),
    tf.keras.layers.LSTM(units=50),
    tf.keras.layers.Dense(2, activation='softmax')
])

model.compile(optimizer='adam', loss='sparse_categorical_crossentropy', metrics=['accuracy'])
model.summary()
history = model.fit(train_x, train_y, epochs=5, batch_size=128, validation_split=0.2)
validation data의 정확도가 점점 떨어지고, loss도 증가하는 것으로 보아 과적합이 발생하고 있는 것 같습니다.
그래프를 통해 확인해보도록 합시다.
plt.figure(figsize=(12, 4))

plt.subplot(1, 2, 1)
plt.plot(history.history['loss'], 'b-', label='loss')
plt.plot(history.history['val_loss'], 'r--', label='val_loss')
plt.xlabel('Epoch')
plt.legend()

plt.subplot(1, 2, 2)
plt.plot(history.history['accuracy'], 'g-', label='accuracy')
plt.plot(history.history['val_accuracy'], 'k--', label='val_accuracy')
plt.xlabel('Epoch')
plt.ylim(0.7, 1)
plt.legend()

plt.show()
training data의 loss는 감소하고 정확도는 증가하지만, validation data의 loss는 반대로 증가하고, 정확도는 떨어지고 있습니다.
test data로 평가해보도록 하겠습니다.
test_text_x = [row.split('\t')[1] for row in test_text.split('\n')[1:] if row.count('\t') > 0]
test_text_x = [clean_str(sentence) for sentence in test_text_x]
sentences = [sentence.split(' ') for sentence in test_text_x]
sentences_new = []
for sentence in sentences:
    sentences_new.append([word[:5] for word in sentence][:25])
sentences = sentences_new

test_x = tokenizer.texts_to_sequences(sentences)
test_x = pad_sequences(test_x, padding='post')

model.evaluate(test_y, test_y)
놀랍게 100%의 정확도가 나왔습니다.. !
조금 믿을 수가 없어서 여러번 다시 학습해보았더니, 50%의 정확도를 보일 때도 있었습니다. 아마 초기화 등 여러 변수들에 의해서 이러한 결과가 나오는 것 같습니다.
3. 임의의 문장으로 결과 확인
'재미있을 줄 알았는데 완전 실망했다. 너무 졸리고 돈이 아까웠다.' 라는 문장의 예측 결과입니다.
test_sentence = '재미있을 줄 알았는데 완전 실망했다. 너무 졸리고 돈이 아까웠다.'
test_sentence = test_sentence.split(' ')
test_sentences = []
now_sentence = []
for word in test_sentence:
    now_sentence.append(word)
    test_sentences.append(now_sentence[:])

test_X_1 = tokenizer.texts_to_sequences(test_sentences)
test_X_1 = pad_sequences(test_X_1, padding='post', maxlen=25)
prediction = model.predict(test_X_1)
for idx, sentence in enumerate(test_sentences):
    print(sentence)
    print(prediction[idx])
완성된 문장이 되면서 부정 응답 확률이 점점 높아지고 있습니다.
조금 짧고 문장인 '우와.. 진짜 완전 노잼이다!!'라는 문장으로 테스트 해보겠습니다.
test_sentence = '우와.. 진짜 완전 노잼이다!!'
test_sentence = test_sentence.split(' ')
test_sentences = []
now_sentence = []
for word in test_sentence:
    now_sentence.append(word)
    test_sentences.append(now_sentence[:])

test_X_1 = tokenizer.texts_to_sequences(test_sentences)
test_X_1 = pad_sequences(test_X_1, padding='post', maxlen=25)
prediction = model.predict(test_X_1)
for idx, sentence in enumerate(test_sentences):
    print(sentence)
    print(prediction[idx])
제대로 예측하지 못하는 것을 볼 수 있습니다.
혹시나 하여 느낌표를 제거하고 다시 테스트를 해보았습니다.
test_sentence = '우와.. 진짜 완전 노잼이다'
test_sentence = test_sentence.split(' ')
test_sentences = []
now_sentence = []
for word in test_sentence:
    now_sentence.append(word)
    test_sentences.append(now_sentence[:])

test_X_1 = tokenizer.texts_to_sequences(test_sentences)
test_X_1 = pad_sequences(test_X_1, padding='post', maxlen=25)
prediction = model.predict(test_X_1)
for idx, sentence in enumerate(test_sentences):
    print(sentence)
    print(prediction[idx])
부정으로 제대로 예측하고 있습니다. 느낌표가 존재하면 긍정으로 높게 평가하는 것으로 추측됩니다.
- 참조
시작하세요. 텐서플로 2.0 프로그래밍
'ML & DL > tensorflow' 카테고리의 다른 글
| [tensorflow] Siamese Network (Fashion MNIST 비교 모델 구현) (0) | 2021.01.11 |
|---|---|
| [Kaggle] Dog Breed Identification (0) | 2021.01.01 |
| 감성분류 on IMDB datasets (2) (0) | 2020.12.24 |
| 감성분류 on IMDB datasets (1) (0) | 2020.12.24 |
| one-hot encoding과 Tokenizer를 통한 Word Representation (0) | 2020.12.24 |


댓글