(tensorflow v2.3.0)
Tensorflow 튜토리얼에 있는 Neural Style Transfer를 따라서 실습을 진행해보겠습니다.
www.tensorflow.org/tutorials/generative/style_transfer?hl=ko
tf.keras를 사용한 Neural Style Transfer | TensorFlow Core
Note: 이 문서는 텐서플로 커뮤니티에서 번역했습니다. 커뮤니티 번역 활동의 특성상 정확한 번역과 최신 내용을 반영하기 위해 노력함에도 불구하고 공식 영문 문서의 내용과 일치하지 않을 수
www.tensorflow.org
사용될 이미지는 케라스 창시자에게 배우는 딥러닝 Github에서 제공하는 이미지를 사용했습니다.
github.com/rickiepark/deep-learning-with-python-notebooks/tree/tf2
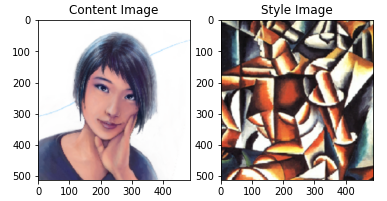
이미지 load and display
이미지를 불러오고, 나타내는 함수입니다. 이미지는 최대 512px x 512px이 되도록 제한했습니다.
def load_img(path_to_img):
    max_dim = 512
    img = tf.io.read_file(path_to_img)
    img = tf.image.decode_image(img, channels=3)
    img = tf.image.convert_image_dtype(img, tf.float32)

    shape = tf.cast(tf.shape(img)[:-1], tf.float32)
    long_dim = max(shape)
    scale = max_dim / long_dim

    new_shape = tf.cast(shape * scale, tf.int32)

    img = tf.image.resize(img, new_shape)
    img = img[tf.newaxis, :]
    return img

def imshow(image, title=None):
    if len(image.shape) > 3:
        image = tf.squeeze(image, axis=0)

    plt.imshow(image)
    if title:
        plt.title(title)
content_image = load_img(target_image_path)
style_image = load_img(style_image_path)
plt.subplot(1,2,1)
imshow(content_image, 'Content Image')
plt.subplot(1,2,2)
imshow(style_image, 'Style Image')
tf.io.read_file : 파일의 contents를 읽음
tf.image.decode_image : contents를 이미지 Tensor로 변환
tf.image.convert_image_dtype : image의 dtype을 변경. 필요시에 scaling 진행(기존 image의 dtype [0,MAX)를 [0,1)로 scaling)
이미지의 콘텐츠 및 스타일의 표현을 얻기 위한 중간층 살펴보기
모델은 VGG19 모델을 사용하며, VGG19에 어떤 layer들이 있는지 살펴보겠습니다.
vgg = tf.keras.applications.VGG19(include_top=False, weights='imagenet')

print()
for layer in vgg.layers:
    print(layer.name)
위와 같은 layer가 있고, 여기서 몇 가지 중간층들을 선택합니다.
content_layers = ['block5_conv2']
style_layers = ['block1_conv1',
                'block2_conv1',
                'block3_conv1',
                'block4_conv1',
                'block5_conv1']
num_content_layers = len(content_layers)
num_style_layers = len(style_layers)
모델 생성
다음으로는 선택한 중간층들의 output을 배열 형태로 출력하는 모델을 생성하겠습니다.
def vgg_layers(layer_name):
    vgg = tf.keras.applications.VGG19(include_top=False, weights='imagenet')
    vgg.trainable = False
    outputs = [vgg.get_layer(name).output for name in layer_name]
    model = tf.keras.Model([vgg.input], outputs)
    return model
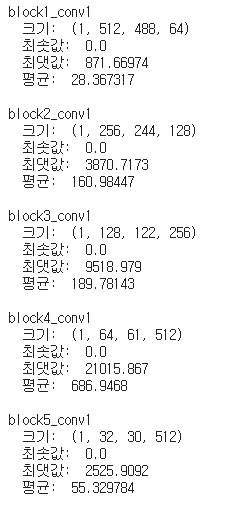
위 함수를 통해서 각 층에서의 style 이미지의 output을 살펴보도록 합니다.
style_extractor = vgg_layers(style_layers)
style_outputs = style_extractor(style_image*255)

for name, output in zip(style_layers, style_outputs):
  print(name)
  print("  크기: ", output.numpy().shape)
  print("  최솟값: ", output.numpy().min())
  print("  최댓값: ", output.numpy().max())
  print("  평균: ", output.numpy().mean())
  print()
Style image Output
content image의 output 중간 layer들의 feature map으로 표현되고, style image의 표현을 정의하기 위해서 우리는 Gram matrix를 사용할 것입니다. 따라서 style image의 output은 각 feature map의 평균과 feature들 사이의 상관관계의 정도를 정의한 Gram Matrix를 구합니다.

Gram Matrix는 위의 식으로 구할 수 있으며, 이 식은 tf.linalg.einsum함수를 통해 계산할 수 있습니다.(분자항 계산)
def gram_matrix(input_tensor):
    result = tf.linalg.einsum('bijc,bijd->bcd', input_tensor, input_tensor)
    input_shape = tf.shape(input_tensor)
    num_locations = tf.cast(input_shape[1]*input_shape[2], tf.float32)
    return result/num_locations
또한, 위 행렬을 사용해서 Style Cost가 계산됩니다.
Content와 Style output을 반환하는 Model 생성
class StyleContentModel(tf.keras.models.Model):
    def __init__(self, style_layers, content_layers):
        super(StyleContentModel, self).__init__()
        self.vgg = vgg_layers(style_layers + content_layers)
        self.style_layers = style_layers
        self.content_layers = content_layers
        self.num_style_layers = len(style_layers)
        self.vgg.trainable = False

    def call(self, inputs):
        inputs = inputs*255
        preprocessed_input = tf.keras.applications.vgg19.preprocess_input(inputs)
        outputs = self.vgg(preprocessed_input)

        style_outputs, content_outputs = (outputs[:self.num_style_layers],
                                          outputs[self.num_style_layers:])

        style_outputs = [gram_matrix(style_output)
                            for style_output in style_outputs]

        content_dict = {content_name:value
                         for content_name, value in zip(self.content_layers, content_outputs)}
        style_dict = {style_name:value
                      for style_name, value in zip(self.style_layers, style_outputs)}

        return {'content':content_dict, 'style':style_dict}
Input image를 통해서 Content Image와 Style Image를 출력하는 모델입니다.
__init__에서 사용될 중간층 모델을 vgg_layers 함수를 통해서 읽어오며, 사용될 style_layers와 content_layers를 설정합니다.
그리고 call 메소드를 통해서 forward propagation을 정의하는데, content_outputs은 content_layers에서의 feature map이며 style_outputs은 style_layers에서의 feature들간의 상관관계인 gram matrix가 됩니다.
위 모델을 통해서 content_image를 입력으로 결과를 살펴보면 다음과 같은 결과를 얻을 수 있습니다.
extractor = StyleContentModel(style_layers, content_layers)
results = extractor(tf.constant(content_image))

print('스타일:')
for name, output in sorted(results['style'].items()):
  print("  ", name)
  print("    크기: ", output.numpy().shape)
  print("    최솟값: ", output.numpy().min())
  print("    최댓값: ", output.numpy().max())
  print("    평균: ", output.numpy().mean())
  print()

print("콘텐츠:")
for name, output in sorted(results['content'].items()):
  print("  ", name)
  print("    크기: ", output.numpy().shape)
  print("    최솟값: ", output.numpy().min())
  print("    최댓값: ", output.numpy().max())
  print("    평균: ", output.numpy().mean())
학습 알고리즘 구현
Gradient Descent를 통해서 Neural Style Transfer 알고리즘을 구현해보도록 하겠습니다.
먼저 목표 타겟을 설정하고, 최적화시킬 이미지를 담는 Tensor를 추가해주는데, 이때 초기화되는 Tensor는 content 이미지와 크기가 같아야 합니다.
style_targets = extractor(style_image)['style']
content_targets = extractor(content_image)['content']
image = tf.Variable(content_image)
그리고 픽셀값은 0과 1 사이 값의 실수이므로 클리핑하는 함수를 정의해둡니다.
def clip_0_1(image):
  return tf.clip_by_value(image, clip_value_min=0.0, clip_value_max=1.0)
최적화 알고리즘을 생성합니다.
opt = tf.optimizers.Adam(learning_rate=0.02, beta_1=0.99, epsilon=1e-1)(LBFGS를 추천하지만, Adam 알고리즘으로도 충분하다고 합니다.)
그리고 content loss와 style loss의 비중을 정의하고, loss를 정의합니다. Loss는 타겟에 대한 입력 이미지의 평균 제곱 오차(MSE)를 계산하고, 오차들의 가중합으로 계산됩니다.
style_weight=1e-2
content_weight=1e4

def style_content_loss(outputs):
    style_outputs = outputs['style']
    content_outputs = outputs['content']
    style_loss = tf.add_n([tf.reduce_mean((style_outputs[name]-style_targets[name])**2)
                           for name in style_outputs.keys()])
    style_loss *= style_weight / num_style_layers

    content_loss = tf.add_n([tf.reduce_mean((content_outputs[name]-content_targets[name])**2)
                             for name in content_outputs.keys()])
    content_loss *= content_weight / num_content_layers
    loss = style_loss + content_loss
    return loss
그리고, Train_step을 정의합니다.
@tf.function()
def train_step(image):
    with tf.GradientTape() as tape:
        outputs = extractor(image)
        loss = style_content_loss(outputs)

    grad = tape.gradient(loss, image)
    opt.apply_gradients([(grad, image)])
    image.assign(clip_0_1(image))
3번정도 학습시켜서 확인해보면 다음과 같습니다.
import PIL
def tensor_to_image(tensor):
    tensor = tensor*255
    tensor = np.array(tensor, dtype=np.uint8)
    if np.ndim(tensor)>3:
        assert tensor.shape[0] == 1
        tensor = tensor[0]
    return PIL.Image.fromarray(tensor)

train_step(image)
train_step(image)
train_step(image)
tensor_to_image(image)
더 오랫동안 학습시켜보도록 하겠습니다.
import IPython.display as display
import time
start = time.time()

epochs = 10
steps_per_epoch = 100

for epoch in range(epochs):
    for step in range(steps_per_epoch):
        train_step(image)
        print(".", end="")
    display.clear_output(wait=True)
    display.display(tensor_to_image(image))
    print(f'training step : {step+1}')

print(f'training time : {time.time() - start:.1f}')
추가 내용(Tensorflow 튜토리얼 내용)
위의 방법에서 한 가지 단점은 high frequency artifact가 생긴다는 점입니다. 쉽게 이야기하면, 경계선이 너무 선명하게 생긴다는 문제인 것 같습니다.
def high_pass_x_y(image):
    x_var = image[:,:,1:,:] - image[:,:,:-1,:]
    y_var = image[:,1:,:,:] - image[:,:-1,:,:]

    return x_var, y_var

x_deltas, y_deltas = high_pass_x_y(content_image)

plt.figure(figsize=(14,10))
plt.subplot(2,2,1)
imshow(clip_0_1(2*y_deltas+0.5), "Horizontal Deltas: Original")

plt.subplot(2,2,2)
imshow(clip_0_1(2*x_deltas+0.5), "Vertical Deltas: Original")

x_deltas, y_deltas = high_pass_x_y(image)

plt.subplot(2,2,3)
imshow(clip_0_1(2*y_deltas+0.5), "Horizontal Deltas: Styled")

plt.subplot(2,2,4)
imshow(clip_0_1(2*x_deltas+0.5), "Vertical Deltas: Styled")
위의 이미지는 고주파 요소가 증가했다는 것을 보여주고 있습니다.(경계선이 더욱 선명해진 것을 볼 수 있습니다.)
또한, 고주파 구성 요소가 경계선 탐지의 일종이라는 점을 알 수 있습니다.
위 문제를 줄이기 위해서 이미지의 고주파 구성 요소에 대한 Regularization 항을 추가해야 합니다. Neural Style Transfer에서 Regularization 항을 통해서 변형된 Loss를 Total Variation Loss(총 변위 손실)라고 합니다.
Total variation loss는 아래와 같이 정의됩니다.
def total_variation_loss(image):
    x_deltas, y_deltas = high_pass_x_y(image)
    return tf.reduce_sum(tf.abs(x_deltas)) + tf.reduce_sum(tf.abs(y_deltas))

total_variation_loss(image).numpy()
tensorflow에서는 tf.image.total_variation 함수가 내장되어 있으므로 이 함수를 사용하면 됩니다.
total variation loss를 위한 가중치를 설정하고, train_step함수에 해당 loss를 추가 계산합니다.
total_variation_weight=30

@tf.function()
def train_step(image):
    with tf.GradientTape() as tape:
        outputs = extractor(image)
        loss = style_content_loss(outputs)
        loss += total_variation_weight*tf.image.total_variation(image)

    grad = tape.gradient(loss, image)
    opt.apply_gradients([(grad, image)])
    image.assign(clip_0_1(image))
다시 학습해보도록 하겠습니다.
image = tf.Variable(content_image)

start = time.time()

epochs = 10
steps_per_epoch = 100

for epoch in range(epochs):
    for step in range(steps_per_epoch):
        train_step(image)
        print(".", end="")
    display.clear_output(wait=True)
    display.display(tensor_to_image(image))
    print(f'training step : {step+1}')

print(f'training time : {time.time() - start:.1f}')
이전 결과와 비교하면 비교적 부드러운 이미지가 생성된 것 같습니다 !
'ML & DL > tensorflow' 카테고리의 다른 글
| one-hot encoding과 Tokenizer를 통한 Word Representation (0) | 2020.12.24 |
|---|---|
| [tensorflow] RNN에 사용되는 layer (0) | 2020.12.22 |
| [Tensorflow] 분류에 사용되는 activation과 loss function(softmax/log_softmax/categorical_crossentropy) (0) | 2020.12.05 |
| [Tensorflow][Kaggle] Cats vs. Dogs Classification(수정 : 2020-12-07) (2) | 2020.12.04 |
| 교통 표지판 분류 예제 (10) | 2020.11.26 |


댓글